This project offers a simple face recognition application using facenet-pytorch with user-friendly GUI. This is designed for actual and practical use where you need to check specific people like your colleagues, friends and family members.


This application is supporsed to run on NVIDIA Jetson Nano. Here is the detail.
- NVIDIA Jetson Nano Developer Kit
- NVIDIA JetPack 4.5 or 4.6
- USB Web Camera or Raspberry Pi Camera module V2
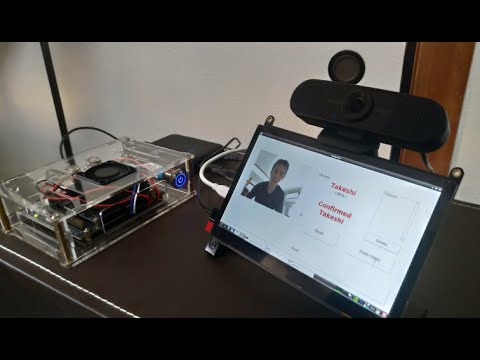
The app's layout is optimized for 7 inch touch display (1024x600). But any larger display can be used.
To install
git clone https://github.com/take5553/face-check.git
cd face-check
chmod +x install.sh
./install.sh
To run
./run.sh
It will take long time to start this app. And make sure your camera is connected to Jetson.
After the app is launched, you will see Main window which has six buttons. For your first time to run this app, just follow the numbers 1 to 4.
1(Face Register) and 3(Recognition) take time to open window. Please be patient.

Put your name in the text box and push "Take a pic" button. If you want to make sure you are close enough to the camera, push "Detection ON" and confirm the red rectangle appearing around your face.
Picture resolution depends on your camera. But the resolution is automatically selected as long as you don't change the config.

One picture per a person is enough. However, under the pandemic situation, taking both of pictures with and without a mask should enhance the accuracy of recognition. You don't need to change data names like "Takeshi_with_mask" or "Takeshi_without_mask" because the app automatically save pictures with numbers after the name. Multiple pictures of the same person don't matter in face recognition.
You can check your registered pictures. If you are not satisfied with the picture, delete it on this window and take another picture on "Face Register" window.

Push "Start" button to start recognition.

During the recognition, your registered name is displayed with the probability when the app recognize you. If you are recognized in 9 frames out of 10, you are confirmed and registered "confirmed list" in the right side of the window. Once you are confirmed, you will not be confirmed again unless you push "Finish Check" button.

If multiple faces are registered and the app mistakenly recognize you as another person, you can delete the recognition by clicking the wrong recognition from the checked list and pushing "Delete" button.
You can check the result on Result window, which you can go from Main window.
- checked: confirmed on Recognition window.
- not checked: not confirmed.
- not registered: the people who are on
checklist.txt(explanation is given below) but not taken the face picture. This list don't have any names for regular use.

You can adjust configurations. The config window is like this. The options may change as the version increases.

Device: the device id and camera connection, csi or usb.Resolution: the resolution set which the camera can process. This is automatically detected.Rotation: to give the direction of rotation.
Width x Height: the size of video and picture. If the camera resolution is larger than this size, then captured images are cropped before displayed.Update Interval: the duration the app update the captured image. This doesn't mean the exact interval between image updates.
Save Directory: the main directory in which face images and recognition sounds are saved. This is unchangable.Face Images Directory: the directory for captured images.Result Save Directory: the directory for the result files.
-
Confirmation Sound: the file to the sound which is played after confirmation to indicate recognition is completed. The available file extentions are what GStreamer can play. (I tested.wavand.mp3and they worked.)Note: If the sound isn't played, check the setting below
Start button -> Sound & Video -> PulseAudio Volume Control -> Configuration

Built-in Audio(The second one): Off

Fullscreen: to switch fullscreen or not.Font Size: the font size which is applied to all windows.
checklist.txt contains a list of names who will be checked on Recognition window. This is automatically generated if it isn't in Save Directory. Default list is the same as the list of files in Face Images Directory without number and extention. Be careful that you need to update checklist.txt when you add registered people, or you can just remove checklist.txt to make the app generate it again.
If you want to check some of registered people, edit checklist.txt and limit the number of them.
For example, if files in Face Images Directory are like this;
Takeshi0000.jpg
John0000.jpg
Kate0000.jpg
And if you wish to check only Takeshi and John, edit checklist.txt like this.
Takeshi
John
Then put it in Save Directory.
In this case, Kate will not be confirmed on Recognition window although the name will be displayed.
You can use your own pictures by putting them into Face Images Directory. Pay attention to these things:
- Make sure the target face is the largest in the picture if other people are in it.
- If picture's size is too big, the app will freeze. Moderate size is up to 400x400. (But I'm not sure!)
- Put 4 digit number between the file name and the extention. ex:
Takeshi0000.jpg - Don't forget to update
checklist.txt, or just remove it.
In setting.json, which is generated by this app, you can see "gst_str" setting. This string is passed to cv2 through JetCam. If you are familiar with GStreamer, you may be able to build streaming pipeline through your network by editing this setting directly. By default, this app generates the string along "camera_settings", "capture_settings" and "canvas_settings".
For daily use, it would be really annoying to wait the app until it's up, enters Recognition window and starts face recognition. To deal with it, "Auto start" function is implemented. Put an argument auto after main.py in run.sh.
The last line in run.sh will look like this:
    # for JetPack 4.6
    take5553/face-check:jp6.0 python3 main.py auto

    # for JetPack 4.5
    take5553/face-check:jp5.0 python3 main.py auto
With this argument, the app will call Recognition window just after Main window and then push "start" button automatically. So all you have to do is just running run.sh a few minites before you actually need this app. If that time is fixed every day, try cron job.
In the lunch break of my workplace, employees who ordered their lunch box in the morning check their names with a marker pen to confirm "I exactly ordered the lunch box" and "I took it." It takes a little time because they have to put off the cap of the pen, look for their name, check it and put the cap back. It's a little thing but it makes a queue.
This small problem ignited this project. I made this app available for more general purposes as well.
The most important point of this application is that it is easy to use, even for people who are not familiar with Linux, Python or Jupyter. Once this app is up and running, you won't have any trouble using it with its familiar GUI and simple controls. This simplicity brings convenience and applicability wherever it is needed.
-
Face Recognition Using Pytorch
https://github.com/timesler/facenet-pytorch
Copyright (c) 2021 Takeshi Yamazaki
Released under the MIT license
See LICENSE
Twitter: Take555